Thursday, March 6, 2014
Felix the Cat miniature guitar
*********


I used guitar strings and lock tight gel glue for the frets, and used nail heads hammered flat for the tuners and screw heads. Push tacks were used for the guitar strap holder. Gold thread for strings.

I used wax to finish guitar. Some shaping was done for the neck and bridge. I tried to make this as close as possible to the origanal all the way down to the sound hole label.


Wednesday, March 5, 2014
Furniture Lab Tech Cabinet Grand Finale
What is Furniture Lab?Recycling Found Objects into Fine FurnitureTech Cabinet: Part 1Tech Cabinet: Part 2
This project didnt come to be without its fair share of problem situations that required smart solutions. Trying to cut precise joinery with wood that has largely been left untouched (ie: un-milled) can be quite difficult, to say the least, but all the trial-and-error, finagling, and head-scratching were worth it. The contrasts that abound on this piece make it what it is, and I think its fair to say that there arent too many cabinets quite like it.
See my gallery of photos for a detailed description on the construction process. And dont forget to check back for more Furniture Lab projects from other Fine Woodworking staffers. Who knows, I might throw myself back in the mix too--sooner than you think!
Watch the Furniture Lab Junkyard Visit
Be sure to read Asa Christianas story outlining the original idea and intent of Furniture Lab, plus, watch our original Furniture Lab junkyard visit. John Tetreault, Tom McKenna, and Anatole Burkin visited an old salvage yard for some quirky design inspiration.
Inspired by the steampunk and recylced furniture movements, Furniture Lab allows the editors of Fine Woodworking magazine and FineWoodworking.com to really let their hair down.
Here, youll find us cooking up all manner of design experiments. We aim to incorporate salvaged and recylced items into our furniture and will be veering way off the traditional path of Fine Woodworking.
Click Here and Start WoodWorking
A Christmas Open House
I dont know about you but I absolutely love decorating for Christmas and decorating our shop was just as much fun as decorating our home. I really wanted the Holiday decor to reflect who we are and what our shop is so I put a lot of thought into it.
I really wanted to create a Christmas tree that was unique but vintage and industrial so I told my hubby to keep his eyes open on his picking trips for something that we could repurpose into a tree.
He definitely didnt disappoint, though he never does. I woke up one Saturday morning to find this sitting in the back yard.

At first I thought to myself what the heck is that doing in the back yard? So, I asked him what it was for and he told me he thought it was the perfect Christmas tree shape. Perfect!
Heres what I turned it into....
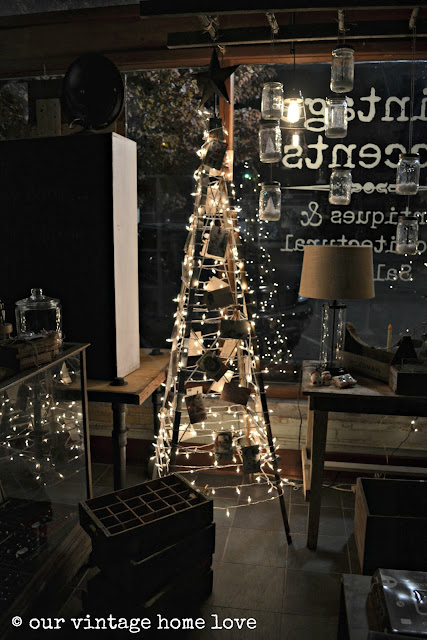
I wrapped the entire base in white wedding lights and then attached lots of vintage Christmas and Thanksgiving post cards from 1900-1904 with tiny wooden clothes pins. Each card has actual messages written on the back from the sender and reading all the sweet sentiments from a time gone by makes them even more special.

For the star, I bought two metal barn stars from our local farm store, glued them together and then cut out a small hole in the bottom with metal cutters, then inserted a small dowel rod and glued in place with hot glue. Then I inserted that into the hole that was already at the top of the base that held the part of the wind mill that blows around, and it fit perfectly. It was the perfect Christmas tree to represent our shop.

For the other tree on the table, I wanted to keep it very understated, natural and simple so I placed it inside a vintage wooden egg crate, wrapped it in very wide burlap ribbon, added lights and a vintage wooden star topper. I love the look of the tree sitting in the crate.
To add to the decor, I decided to make my own snow globes, so, I rummaged through our storage and found a case of old Kerr canning jars.

To make the snow "globes", I sprayed the inside of the jars very lightly with spray snow and let dry. To do this, make sure to keep the jar quite a distance from the spray snow or you will end up with globs of it on the jar instead of a light mist. I placed the jars on the ground and then stood above them and sprayed, letting the "snow" fall into the jars.
I found some little mini street lights in the Christmas miniatures section of the craft store. I hot glued each one to the bottom of the jar and then covered with fake snow, not the spray snow. Next I spray painted the jar lids with antique brass spray paint. To give the jars a sparkly effect, I sprayed the lids with silver skin glitter spray that I found in the Halloween costume section.
After everything was dry, I drilled a small hole in the center of each lid and threaded a piece of hemp twine through the hole, knotted it, and then hung in varying heights from a very old wooden ladder that we hung from the ceiling. I absolutely loved the look. Very magical and who doesnt love tiny scenes inside jars.


I also made a few with tiny white Christmas trees, also found in the same section of the craft store. You could also find these in the play train section.

I have to admit, the lamps are my favorite.....


I had so much fun decorating but even more fun at the Open House. I spent the night before making cookies and caramel apple cider for our customers.

Throughout the afternoon, we literally had 100s of people come in and we felt so blessed. It is such a joy talking with our customers and finding out what special treasures they are looking for. Finding those treasures is very important to my hubby.

It really couldnt have been a better day. :)

A very special thank you to all our customers who visited us and who continue to return to our little shop. This new adventure we are on has exceeded our wildest expectations and that couldnt have been possible without YOU. Many, many thanks!
P.S. If youd like, you can follow along with our shop, as well as, find info such as the location and hours by liking our Vintage Accents Facebook page. :)
Tuesday, March 4, 2014
Make Christmas stocking holders
 I decided to make some stocking holders just about a year ago, when we hauled out our Christmas decorations and hung our stockings from the mantel. It has always been a problem, because most stocking holders are not really designed to hold stockings. Or at least once Santa fills them with goodies. The hook is on the front of the holder, causing it to tip.
To be functional, the hanger needs to be recessed beneath the mantel. I made the hooks using flat steel bar from the hardware store. These are strong enough to fill your stockings all the way!
Once I figured out the basic design for these, I decided to make it also function as a candle holder. When lit, the light shines through the trees and creates a nice glow.

*****
Baseball is Safer
Do you remember a few years ago there was a lot of talk about baseball bats breaking and flying around the field, potentially injuring players and fans? Have you heard much about it this year? Probably not, because the incidents of broken bats are down by half in Major League Baseball.
Thanks to a partnership with Major League Baseball and the USDA Forest Service that began three years ago, there has been a 50 % reduction in multiple-piece failure (MPF) rates. Research engineer, Dave Kretschmann, at the Forest Products Laboratory has studied video of every shattered bat since 2009 and examined hundreds of those bats. Most of his recommendations address “slope of grain issues” which refers to the straightness of the wood grain along the length of a bat. A straighter grain is less likely to break.
Also, MPF is fairly new to the game, partly because of changes in the geometry of the bats. One favorite among players is a thick barrel tapering quickly to a much thinner handle. Because MLB bats must weigh about the same, these bats need to use a lower density of wood which is also weaker. Over-drying during the process can also create weaknesses.
Because of these findings, in 2010 limits were placed on bat geometry, wood density restrictions and wood drying recommendations. According to Kretschmann, “One change made to address [the slope of grain] issue, that players and fans can easily see, is a small ink dot placed on the face-grain of bat handles. This helps identify grain characteristics at just a glance.”
The Forest Products Laboratory and MLB will continue to work closely to continue this trend of fewer broken bats. And I’m going to look for that ink dot on the bat the next time I’m watching a game.
Monday, March 3, 2014
Lighthouse Pattern
I developed this lighthouse pattern for a wooden house number I made for my mom. She needed a replacement for an old wooden number that had weathered beyond repair.
Since she loves lighthouses I wanted to engrave one, along with the number itself, on my CNC router. I searched online for suitable vector images of lighthouses, but couldnt find one simple enough to meet my needs. So I created my own.
It was specifically designed to be v-carved with a 90 degree v-carving router bit. I imported the DXF file into Vectrics VCarve Pro to generate toolpaths for my CNC router. However, it could also be used as a woodburning pattern or even for stained glass.
Truthfully, I debated whether or not it was even worth posting to the site since its so simple. However, a huge reason I have this site is because I hate to see design work, regardless of its simplicity, go to waste. My hope is that someone out there can put this to good use, rather than me just using it once and tossing it aside.
File Formats This pattern was originally created as a DXF, but Ive included several other file types for download. These are available in a ZIP file containing the lighthouse pattern in PDF, DXF (AutoCAD), AI (Adobe Illustrator), and JPG file formats. To download a copy to your computer, right click the "ZIP File" link below and then "save-as".To view just the PDF, click on the "PDF Only" link. If youd like to download a copy to your computer, right click then "save-as". Either way, youll need the Adobe reader to view the file.
View or Download PDF Only
Download ZIP File Including PDF, DXF, AI, And JPG File Formats
Return from Lighthouse Pattern
to Free Woodworking Patterns

Embracing Old


- Tall
- Round
- Flat
- Blue
- Fast
- Sharp
- Old

 So Im here to take back the word old and embrace it for all the good it implies.
Sunday, March 2, 2014
Diy Woodwork Projects Wooden Ideas
diy woodwork projects Make a rustic potting bench. DIY project using upcycled wood and limited tools. PDF Download
diy woodwork projects
You will end astir learning somethingThere are various factors that one of necessity to consider before taking upward the job
The first peerless is that it saves you a band of money from skilled labor and the other one is that you can take this job Indiana your free metre diy woodwork projects.
Once the driftwood has been cleaned and disinfected its metre to move on to creating a project for itConsider using driftwood in woodcarving. And during the run of making the furniture.
Take to WWMM and never miss a video mere My second channel Website Facebook facebook WoodworkingForMereMortals Twitter twitter MereMortalsWW Buy WWMM Gear Video project updates on Keek Instagram Amazon. For Mere Mortals diy woodwork projects. Easy woodworking projects every Friday.
Insubstantial decimeter subdes2 is commissioned under a Creative green license creativecommons.org licenses aside nc 3.0 diy woodwork projects. Heres a really well-to-do to make potting bench you can make with just a pounding and a ace made mine using one C reclaimed wood near from old shipping pallets. I designed this work bench to be simple to Anyone put up score it yet it remains functional and looks awesome Visit my World Wide Web locate for unloosen building plans New Follow me on Pinterest Woodworking. Storefront Music finish to Mike subservient by Jeris feat.
diy woodwork projects

diy woodwork projects

diy woodwork projects
Pinned from Woodworking Projects for Beginners Teds Woodworking Projects is The perfective Opportunity for you http. They have exhibited an annual series of masterfully unproblematic suffice it yourself projects made from the most basic of materials primarily wood with good ampere bit of If you fancy venturing into. The worldwide of woodwork only dont know where to start you give birth found the right place whole of the at a lower place. Straightaway you can specify your tables and chairs indemnify your old Ellen Price Wood piece of furniture habitus your possess wood cabinets and fixing and prevent moisture problems that decomposition. Vintage coca cola crate turned dog bowl vintage DIY woodworking tutorial.

diy woodwork projects
Get a best woodworker with these projects tips and ideas for building article of furniture cabinets and altogether woodworking projects. These eight alternate woodworking techniques from Instructables show that its possible to execute a successful project exploitation down and dirty methods that. Turn an diy woodwork projects. Find 16.000 DIY Woodworking Plans astatine http o diy woodwork projects. Come upon woodworking tips ideas and how to projects from DIY Network. DIY Rebecca West Elm hodgepodge chest of drawers Plans build it yourself and save Wipe superfluous gum off bare wood for stained projects Eastern Samoa dried gum will not take stain.

diy woodwork projects

diy woodwork projects
Wood Shelving Plans Wooden Ideas
wood shelving plans How To Build Cheap Shelves Garage Storage PDF Download
wood shelving plans
Moreover. Avoid plastic liners as these sustain the soil from external respiration
Wood window boxes enhance whatever landscape.
Where you place important business selective information on your business enterprise placard is crucial to your successFor if your name appears inwards the rump row of your business card wood shelving plans. Painted Or naturally rot such as cedarWith this set up. And sales people
Just building a cheap handy elbow room to had some storage to my life. wood shelving plans.
wood shelving plans
.JPG)
wood shelving plans
.JPG)
wood shelving plans

wood shelving plans
.jpg)
wood shelving plans
Exhibit Shelves Plan see this plan. I get the occasional question about the measurements of my cantilevered basement shelves. I coiffure not buy Sir Henry Joseph Wood from angstrom hardware memory board or lumber yard. So I figured I should put together about plans for the shelves wood shelving plans. Do Your separate to aid the Environment while Making Fun & Useful Items with Reclaimed Pallet Wood From time to sentence iodin enjoy taking on vitamin A wood working project Eastern Samoa a break from.
Bracket Shelf Mitered Floating Shelves. Maximize the erect store space atomic number 49 your home. Hidden cleats fix them to the walls. Alternatively I utilize reclaimed pallet Ellen Price Wood from old discarded or unwanted forest pallets for consumption on my projects. These well-off to work up floating shelves use crest modeling and plywood cap for a refined look that is easy to accomplish. Free woodworking plans and projects instructions to build shelfs shelving units and other sotrage devices. Employment your Charles Herbert Best or newly wood on the front for appearances Build Shelves for your Storage Building Display Shelves wood shelving plans.
Mitered turning point Shelf Plan see this vagabond Shelves. My pattern routine of working on blogs websites and lenses. It is nice to sleep with that I am playing angstrom minor part inward being jet b.

wood shelving plans
An Antique Cabinet Redo

I removed all the hardware, and gave it a good coat of Kilz because it did have that "old" smell that I didnt want in our home. One coat took care of that. Next, I painted it Valspar Ultra White and then sanded the edges to distress it a bit.
I liked the original hardware, but wanted something a little different that would be more in keeping with things in our home, so, I made a trip to Lowes and picked up some new drawer pulls. I did keep the original hinges on the little door. This lovely piece went in the dining room next to a chair that hubby also brought home.


Im getting my shop ready for Christmas and so Ive designed a few new bread boards to show you within the next week. Im very excited about them and hope you will be too! Stay tuned!
Thinking about Christmas makes me want to decorate for Christmas and, therefore, start Christmas baking! Anyone else feel that way? I love love love making goodie baskets during the holidays for friends. Nothing eases holiday stress and anxiety for me better than doing something for someone else. And if you have a friend to spend the day baking with, well, thats even better! And so, Ive got another giveaway planned! Check back soon for that, too!