Wednesday, March 5, 2014
A Christmas Open House
I dont know about you but I absolutely love decorating for Christmas and decorating our shop was just as much fun as decorating our home. I really wanted the Holiday decor to reflect who we are and what our shop is so I put a lot of thought into it.
I really wanted to create a Christmas tree that was unique but vintage and industrial so I told my hubby to keep his eyes open on his picking trips for something that we could repurpose into a tree.
He definitely didnt disappoint, though he never does. I woke up one Saturday morning to find this sitting in the back yard.

At first I thought to myself what the heck is that doing in the back yard? So, I asked him what it was for and he told me he thought it was the perfect Christmas tree shape. Perfect!
Heres what I turned it into....
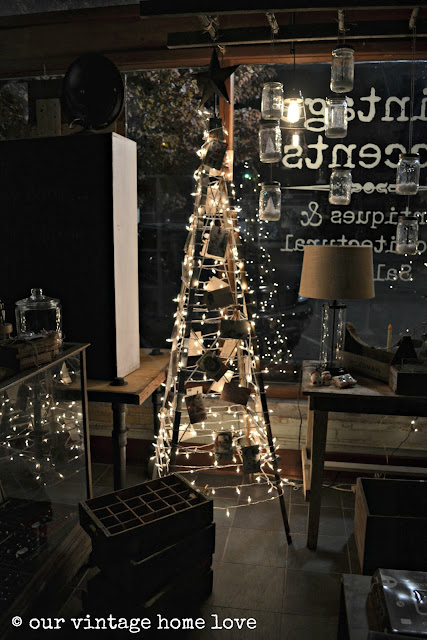
I wrapped the entire base in white wedding lights and then attached lots of vintage Christmas and Thanksgiving post cards from 1900-1904 with tiny wooden clothes pins. Each card has actual messages written on the back from the sender and reading all the sweet sentiments from a time gone by makes them even more special.

For the star, I bought two metal barn stars from our local farm store, glued them together and then cut out a small hole in the bottom with metal cutters, then inserted a small dowel rod and glued in place with hot glue. Then I inserted that into the hole that was already at the top of the base that held the part of the wind mill that blows around, and it fit perfectly. It was the perfect Christmas tree to represent our shop.

For the other tree on the table, I wanted to keep it very understated, natural and simple so I placed it inside a vintage wooden egg crate, wrapped it in very wide burlap ribbon, added lights and a vintage wooden star topper. I love the look of the tree sitting in the crate.
To add to the decor, I decided to make my own snow globes, so, I rummaged through our storage and found a case of old Kerr canning jars.

To make the snow "globes", I sprayed the inside of the jars very lightly with spray snow and let dry. To do this, make sure to keep the jar quite a distance from the spray snow or you will end up with globs of it on the jar instead of a light mist. I placed the jars on the ground and then stood above them and sprayed, letting the "snow" fall into the jars.
I found some little mini street lights in the Christmas miniatures section of the craft store. I hot glued each one to the bottom of the jar and then covered with fake snow, not the spray snow. Next I spray painted the jar lids with antique brass spray paint. To give the jars a sparkly effect, I sprayed the lids with silver skin glitter spray that I found in the Halloween costume section.
After everything was dry, I drilled a small hole in the center of each lid and threaded a piece of hemp twine through the hole, knotted it, and then hung in varying heights from a very old wooden ladder that we hung from the ceiling. I absolutely loved the look. Very magical and who doesnt love tiny scenes inside jars.


I also made a few with tiny white Christmas trees, also found in the same section of the craft store. You could also find these in the play train section.

I have to admit, the lamps are my favorite.....


I had so much fun decorating but even more fun at the Open House. I spent the night before making cookies and caramel apple cider for our customers.

Throughout the afternoon, we literally had 100s of people come in and we felt so blessed. It is such a joy talking with our customers and finding out what special treasures they are looking for. Finding those treasures is very important to my hubby.

It really couldnt have been a better day. :)

A very special thank you to all our customers who visited us and who continue to return to our little shop. This new adventure we are on has exceeded our wildest expectations and that couldnt have been possible without YOU. Many, many thanks!
P.S. If youd like, you can follow along with our shop, as well as, find info such as the location and hours by liking our Vintage Accents Facebook page. :)
Monday, February 24, 2014
Had a Break In
They stole
-Senco Framing Nailer
-Senco Brad Nailer
-Bostitch Roofing Gun
-Dewalt RO Sander
-Dewalt 14.4v Cordless Drill
-Case of Kreg Pockethole Screws
-Face mask Respirator
I was so disapointed when I realized what was stolen. I hadnt gotten my insurance finalized yet so none of the items stolen where re-inbursed. Not much I can do about it now except hope that the police find my tools or that I find them in a local pawn shop. Now I am getting insurance as soon as I can!
Sunday, February 23, 2014
WHAT IS A DOERNBECHER pre WWII desk


Friday, February 21, 2014
Putting A Finish On The Craftsman Desk Repair


I put it through a series of repairs and removed all the old, beaten finish down to bare oak.

Getting the finish right was important. A great finish could make the difference between this looking like an average Craftsman style desk you can find in any furniture store. Again I went to the Craftsman Bible, Bob Langs "The Great Book of Shop Drawings For Craftsman Furniture." and he didnt lead me wrong.
I gave the piece a quick finish sanding at 220 grit followed by a wipe down with a tack cloth. Then I wiped on two coats of Dark Walnut Watco Danish Oil and let it cure for two days. I gave it a light scuff buff with some steel wool and hauled the desk out of the shop and into the sun.
I then put on a half dozen coats of amber shellac. I buy the Bullseye brand from the local home center and cut it 2 parts shellac to 1 part denatured alcohol. Working in the sunlight is great because it speeds the already fast drying of the shellac and on a larger piece like this by the time you get to the end of one coat you can grab a quick drink of water and start over at the beginning again.
After the final coat of shellac I let it cure for a day, then a quick buff down with a finer steel wool to take down any dust nibs and even the surface. I followed this with a coat of paste wax and buffed that out by hand.
The results. . . I found them to be fantastic.


With the wax on there was nothing left to do but move the desk up the stairs into my daughters bedroom. The trick was getting her to clean up, pick up, and move things around to open the space. I quickly shot some pictures before the clutter could crash back into place.

From a surprise of a project to start to some interesting repairs and problem solving to pull it together. This was a pretty fun and satisfying project. A good jump out of the gate in my new shop.
Ratione et Passionis
Oldwolf
A Diy Guide On Woodworking Jigs

Types of Woodworking Jigs
Dovetail jigs are great for making dovetail joints accurately. These can be purchased relatively inexpensively. Another option is to make your own dovetail jig. You can find templates for making your own jigs on the internet or in most stores that sell wood working supplies. Many of these templates allow you to make up to twelve different size jigs.
You may want to puck up a dovetail bit for your router and a dovetail saw. These are great tools if you intend to make your own jigs. Templates allow you to make variable spaced or fixed dovetails for a variety of projects, including cabinets, drawers and small boxes. Some systems come with bits and templates together in one kit. These save money compared to purchasing the components separately.
Dovetail saws are used to cut not only dovetails, but other fine joints for projects. The blades on these saws are thinker than other saws. This allows for greater accuracy. It’s important to purchase a good quality tool for making tight joints and professional looking projects. Look for about fourteen to seventeen points per inch in a good quality saw.
A dowel jig is used for making quality, consistent dowels. If you are using a thick timber, get a self centering jig for better accuracy. There are a variety of sizes from a quarter to one half inch. Complete kits are available that include the dowel jig with several hundred dowels in a variety of sizes. Glue is sometimes included in these kits.
A kreg jig is great for cabinet making. Perfectly positioned slides are necessary if the movement in the drawer is to be smooth. Using kreg jigs save time because you won’t need to measure and mark the spaces for drawer slides. These make it easier to mount metal drawer slides. They can be used for center, bottom or extension mounted drawers. This is an inexpensive, yet versatile piece of equipment.
Making Woodworking Jigs Yourself
Making your own woodworking jigs saves money in supplies. Use inexpensive materials and scrap pieces of plywood for making your own jig. Since you use the jigs for one project only, you don’t want to spend much on materials. If you plan to re use your jigs, use a stronger hardwood to make them.
You can find instructions for making your own jigs in woodworking books or magazines. Instructions are also available on the Internet. You can print these out for future reference. Consider getting a good binder to keep your jig making instructions organized in your workshop. Using plastic page covers will protect the instructions from getting dirty, ripped or damaged.
Wednesday, February 19, 2014
Selecting A Conference Room Chair
the right conference room chairs. You may want to
consider several things, such as the comfort of your
clients and guests, along with staying on a budget -
all without compromising your professional appearance.
Seeing as how your guests and clients may be sitting
for extended periods of time, the chairs you choose
should be ergonomic for all body types. The more
comfortable the chairs in your conference room are,
the less likely your guests will have to take breaks
or get up during meetings.
Several conference room chairs will offer a contoured
seat and back that will allow you to adjust the height
and also the angle of the chair for better lumbar
support. Most offer a swivel mechanism that will allow
you to move from side to side with little to no effort.
You can also get sturdy wheels as well, which is ideal
for sliding across the floor even carpet.
If you dont want to scratch the floor, you can get
rubber tipped casters on the rollers. Conference room
chairs also feature tilt tension to keep muscles
flexible during meetings. You can also add chair arms
as well, which will help to provide extra support and also
help guests and clients maintain good posture.
You should also consider the look as well as the feel of
your conference room chairs. If at all possible, you
should try to select designs and colors that match the
current look of your office or conference room. Youll
want all the chairs for the room to be consistent with
both style and color.
A majority of chair manufacturers will allow you to
customize the upholstery of the back and the seat with
leather, synthetic blends, padded foam, or even stitched
fabrics. To make the chair look a bit more professional,
you can also have the arms of the chair upholstered.
When you spend the money on a conference chair, you cant
go wrong simply because of the durability these chairs
have to offer. They offer strong frames and quality
mechanics, making them last anywhere from 10 - 15 years.
In addition to this, most manufacturers will offer
limited lifetime warranties as well on these chairs to
protect your investment in the long run. These types of
warranties will cover the frame, mechanisms, and even
severe rips in the upholstery.
A conference room chair is a great investment for any
office, as it will keep your guests and clients very
comfortable during those important meetings. A conference
room without a conference chair just doesnt make any
sense at all.
Wood Practical Ideas on How to Build a Shed

Gates fall basically into two categories of styles, ornamental and utility. Utility gates are built for access to livestock pens, access to yards or keeping animals out of your garden for instance. Since appearance is not the prime factor, these gates may be constructed of metal pipe, wire fencing, vinyl, wood or other similar materials. Gates used for access to flower gardens, pergolas, decks and other areas where beauty is as important as the gate function itself may be constructed of cedar, pressure treated materials, common pine stained or painted but the possibilities are endless. No matter what the intended use of your gate may be, the assembly is basically the same.
Once the type of gate is chosen and the location is selected, you must decide the finished size of the opening you desire. A person gate at 36" wide is fine for walking but you may want a 40" gate perhaps to make passing a wheelbarrow less of a chore. The wider the gate, the more it will need to be reinforced against sagging or bending.
Start by working on a level surface wider than the finished gate dimensions. A picnic table or saw horses with a sheet of plywood both make an excellent temporary work bench. For this project you will need protective glasses, tape measure, pencil, circular saw or real good hand saw, screws or nails and depending upon the size of the gate perhaps a couple of small turn buckles, screw eyes and some light cable. We will construct a 36" gate but larger gates are basically the same procedure. Start by cutting the two horizontal 36" long pieces that will hold all the vertical slats for the gate. Lay out these two pieces on your work bench with the lower cross bar about four inches up from the bottom of your gate and the other four inches down from the top of your gate. Tack these lightly to keep them from shifting around while you work. Measure from corner to corner of the bars to assure they measure exactly the same distance. If they do, they are square to each other. If not, they are not parallel and an adjustment must be made until the measurements match. Now cut your vertical pieces of lumber. Try to remember that as individual pieces they may seem lightweight but when you add them all together the gate can become quite heavy. I have made gates with a one by three horizontal bars and 1/4" vertical slats that function just fine as a gate to a chicken pen for example. Gates to a garden that needs to keep out deer must be heavier materials.
The vertical slats of your gate may have the top ends cut square, half round, scroll, pointed or any design you wish to make. Starting on one side of the gate, temporarily nail a vertical slat into place keeping the edge of the slat flush with the ends of the horizontal back braces. Now do the same on the opposite side of the gate. With these two slats in place lay out all the remaining slats. Adjust all the slats to create even spacing between them unless you want a closed face gate. A closed face gate will usually require at least one slat to be rip cut for width. Leaving small spaces between the slats allows you a little more leeway. Once all the slats are in final position, double check your corner to corner measurement to assure the gate is square. If it is good, go ahead and nail or screw all your slats into place. Now turn the gate over to work on the backside being careful not to twist or "rack" your gate out of square. For smaller gates, cut a brace that will fit on a diagonal from the end of the top horizontal to the lower opposite end of the lower horizontal. When in place, it will look like a giant letter "Z". Nail or screw the diagonal into place. On a larger wooden gate, you may need to install two screw eyes at opposite corners from high end to low end also on a diagonal and add a small turnbuckle with a cable to provide added support against sagging.
Install your support post for the gate making sure it is of sufficient size to support the gate without bending or leaning. Choose a heavy duty set of hinges and I strongly recommend you use galvanized wood screws to fasten the hinges to both the gate and the post. Keep the gate above the ground to allow it to swing freely. If you live in Northern climes make sure you leave room for snow if the gate is to be used in winter. Double check that the gate swings freely without binding or dragging. Install some type of device such as a barrel bolt to hold the gate in a closed position. Built out of wood scraps my last gate costs only a few dollars for new hinges and a lock bolt and a couple of hours of my time.
Tuesday, February 18, 2014
A Look At The Fundamentals Of Stenciling
Stencils Explained
Homes and offices are made to be more sophisticated when some patterns or images are employed by means of stenciling. For the basics, a stencil is a kind of template which creates an exact replica of an image every time it is transferred on a surface. Walls, fabrics, and glasses are some of the commonly used surfaces. This tool allows the application of paint from the edges bound inwards following a certain pattern. Shapes, symbols, letters, and other patterns are easily transferred with the use of this medium.
The open sections found in the stencils are known as the islands. They are the areas that allow you to apply the color that you want to use for your theme or concept. The bridges are those materials that separate the islands from one another so as to maintain the stencils shape. These bridges help block the paint from going towards the surface and ruining the artistry of the design.
Stenciling Defined
As with stenciling, it is the process of the production of the image by making use of stencil, application of any color or paint, and with the removal of any of the islands, the result is the duplication of the exact image on a particular surface. Another term to describe this is the stencil coloring.
Your Style, Your Design
The use of stencils actually lets your creative juices pour out. There is no limitation when it comes to the use of your own imagination. You can create designs that are in accordance with your personal style and options. If you are not so good at using the canvas and paintbrush, perhaps stenciling is more apt for you.
Stenciling does achoice with the usual ordeals on maintaining the right proportion or perspectives for the matter. You dont have to deal with the concepts of dimension, or the objects distance. The size also doesnt matter.
Stencils let you rule. You decide as to the image and colors to use. You decide as to the size of the image or the surface wherein to transfer the image of an object. In short, it is your project and nobody has the right to control you. Furthermore, the materials are widely available both at the arts and crafts supplies shop in your locale and online stores.
Your Own Imagination is the Limit
Again, everything depends on your choice. For starters, a couple of stenciling ideas may be done on your home walls, ceilings, chair rails, wall borders, table borders, cabinets, and the likes. Start with some things that you see around your home. If you have mastered it, you can try stenciling on fabrics. Later on, you may try it out with glass.
Be creative. Follow your instinct. Stenciling is actually a choice to save on home improvement expenses.
Sunday, February 16, 2014
How To Build A Deck DIY

Lets get started with the basics of building a simple, yet functional deck. Youll have a few choices, depending on your needs and the area in which you plan to build. The answers to the following questions will help you in creating the design for your deck. Youll likely need a building permit and youll need to have your design in hand for that.
To determine your DIY deck design, lets consider the following questions:
What is the grade of the land? Youll need to make sure it slopes away from the house at least 1 for every 15", so the water will not accumulate around the foundation.
Assuming youll be using pressure treated lumber for your deck, youll be able to choose from 5/4" x 6 (which is really 1" x 5 1/2) or 2" thick (really 1 1/2") in lengths of 4, 6 and 8.
Once youve determined the appropriate size for your deck, this will guide your choice of ledger (joist that connects to the house) size. Ledger sizes are typically 2" x 6, 2" x 8 and 2" x 10.
Support posts will typically be 4 x 4 for decks lower than 5 from the ground.
In general, beam size for spacing up to 9 will be 4 x 8 and 10 and over will require 4 x 10.</blockquote>
With these answers, your DIY deck design will come together beautifully. Once youve got all your decking materials and permit if necessary, youre ready to begin.
You have already checked the grade so now just remove any sod and clean the area of any debris.
Mark the ledger location on the house. Dont panic! Its easy. It is calculated by measuring 1" below the door plus the thickness of the material, plus the joist. Mount the ledger to the studs using 1/2" lag screws a minimum of 3" in length, with a washer placed on it for water drainage between the deck and the house. Use at least 2 lag bolts on each end and a minimum of 1 on each stud in between. Make sure to double-check that it is level as you go along.
Hammer stakes into the ground and run strings from the ledger to establish the perimeter of the deck, making sure your calculations are square.
Based on these perimeter calculations, dig your post holes at least 8 deeper than the frost line and then back-fill 6" to allow for proper drainage. Fill hole with concrete and allow to set. It is very important to wear a dust mask when you dig the hole so you dont inhale mold spores. Wear it when you mix concrete as well, since both contain small particles that can lodge in your lungs and cause lung disease. No project is worth that price, so be smart about it.
Once the concrete has set, attach posts using concrete anchor bolts. Attach the beams using post-to-beam connectors double-checking that everything is level.
On beams and ledger, mark the locations for your joists. With crowns facing upward, set your joists in place and nail a rim joist across the ends.
Cover the ground below the deck with black polyethylene to keep weeds from coming up.
Using galvanized or stainless screws, attach your deck boards across joists, laying them side by side. Its not necessary to leave a gap as the pressure-treated wood will shrink slightly causing gaps naturally. Make sure any bowing of your decking material faces downward. If boards are uneven on ends, snap a string and cut uniformly. Sawdust is more hazardous to your lungs than the smoke from cigarettes, so always remember to protect them. Wear glasses or goggles to protect your eyes when cutting.
If your deck is low enough it wont require a railing. Check the building regulations in your area. If you do need a rail, place railing posts at each of the corners and at intervals of 6, or centered if your deck is less than 12. Attach caps and balusters and add a step if needed.
A word to the wise:
This is a comprehensive overview, be sure to check the building codes for your area to insure you only need to do the job once. Be careful, take your time, measure twice, use common sense and remember safety first. Protect your hands, eyes and lungs. When you take on a DIY project, you and you alone are responsible for your safety and well-being, so stay focused, dont allow kids or animals around your tools or materials. </blockquote>
These simple precautions will help to keep things running smoothly. Soon you will have completed a project that you can be proud of for years to come. Then it will be time to fire up the barbeque and invite your friends and family over for some fun and maybe just a little showing off!
Monday, February 10, 2014
Linseed Oil A Cautionary Tale

Linseed oil can create a beautiful finish on fine furniture and metal work. Its an easily renewable finish, a natural product in some of its forms. I use it to refresh my wood counters and the finish on some of my earlier oil finished pieces in my home. The counter you see above is now in the once a year for the rest of your life phase of the finish process, is used hard daily and looks terrific with little care. That little pile of rags in the foreground though could completely wipe out my house or yours if you werent paying attention. Tragically, it happened to a friend/client a few weeks ago. They came by yesterday and now that they have seen that some of their furniture will be coming back, I think its ok to publish this cautionary tale. Wikipedia says: Linseed oil is extracted from ripe flax seeds by cold pressing. It has natural characteristics that make it an excellent product to produce a beautiful and durable finish on wood products. It does, however, have a potential downside as Wikipedia points out in the second sentence of the description .... Linseed oil can polymerize and the reaction is exothermic, and rags soaked in it can ignite spontaneously. True enough. Only the prompt and professional response of the Dorset Fire Department and other mutual aid companies prevented the building from being a total loss. So, I now have, in the upstairs of my garage, a large selection of smoke damaged furniture and we are currently working through the cleaning and polishing of some of the pieces. Its a sobering but rewarding process. DISPOSE OF YOUR RAGS PROPERLY !!!

The library before. We built the table back in 2004 ...

The table after the fire ... It was covered with papers and since the room didnt actually burn, the papers protected the finish somewhat. There are still ghosts of the objects that were on the table left and we are probably going to strip the top and refinish it. The base is fine and looks great now.

One of the chairs below had been in for a tune up in March ... They are truly amazing pieces ..

One of these we fixed up back in March ...

This is a before picture from my previous blog post ...They are pretty toasted now but I think theyll be OK if were careful and lucky.

This piece was one of the furthest in the house from the start of the fire in the garage, but it was still pretty heavily smoke damaged .... The smoke gets into every crack and crevice ...

But we got it. Shellac and Butchers Wax are your friends after its clean .. The chair in the foreground is from the library and it got slightly overcleaned as the original finish had black at the intersections of the spindles, legs and seats and until we looked closely at the photos of the library before the fire we couldnt understand why we couldnt get that smoke off. Well continue to work on the pieces ... There are several important ones yet to go .... When we have a definitive cleaning process, Ill post it here ... Weve got , obviously, a couple things that work, but were still refining our techniques.
Dispose of oily rags properly is an understatement. Do not operate heavy equipment under the influence of drugs or alcohol .... same deal ... Be careful ....
Thursday, February 6, 2014
A BRIEF DESCRIPTION OF THE LOCAL SCENE
In the early 1980’s there was a deep recession that killed most of the large unionized woodworking operations. Many of these were re-born as smaller non-union shops. The general impact of this is that it lowered wages and generally loosened things up. I think it made it easier for smaller artisan / artist shops to get a start as suppliers could not discriminate to the same extent who they would sell to. Now most suppliers don’t care if you are a twenty five person shop in an industrial complex or one guy working out of his garage.
It is also much less expensive to set up a small woodworking operation in the Vancouver area now. This is the up side of Chinese imports, reasonable quality machinery is plentiful and affordable. For example, in the ‘80s most of the machinery available for small shops was either General, made in Quebec or American products such as Rockwell / Delta. Choice was limited and costs were high. Now there is a huge proliferation of cheap imports. Many companies like General, import cheaper lines, theirs is called General International. Their domestic line has hardly changed in the last half century while their import line includes many innovations of quality products suitable for the small shop.
Although gentrification has had a big impact on the availability of shop space, municipalities like Vancouver, Richmond, North Vancouver and Burnaby have retained a large amount of light industrial areas for small shops. Many of the larger shops have moved to industrial complexes in the suburbs. East Vancouver has a very vibrant artisan / artist based woodworking scene with many practitioners living and working in that area. Vancouver continues to grow, and the powers that be continue to pursue population growth as the driving force of the economy. It would seem inevitable that this strategy will lead to further gentrification and the re-development of older light industrial property.
In summary, at this time, I think that it has never been easier to set up a small woodworking business in this area and more people than ever are doing it.
Tuesday, February 4, 2014
The Wood Shed Again Last time for a while

Ma ... on the new porchette ....

Still working on it ... My firewood arrived Saturday, and construction will have to take a break until thats stacked in the shed. Fortunately, we were able to get the little bit of inside framing work done this past weekend and were good to go ... Well finish the outside over the course of the summer, with the work sprinkled in at a little more leisurely (if thats possible considering I started back in April) pace ... All work, (even if its fun work), and no play makes Jack a dull boy .... Click the photos to enlarge them ...

Thursday, January 30, 2014
Description How to properly layout a home woodworking shop
Popular How to properly layout a home woodworking shop must try
How-to projects - lowe's, Want to build a new deck or pergola? or maybe do some general home improvements? whatever your project, lowe's can show you how. you can find step-by-step. Rockler - woodworking tools supplies hardware plans, Shop for woodworking tools, plans, finishing and hardware online at rockler woodworking and hardware. find thousands of woodworking supplies like drawer slides.
How to videos: instructional, diy & how to video | ehow, Developing your lower quad is something you can do by targeting the area with the right kinds of exercise. find out about an exercise that you can do to develop the. Doityourself.com - official site, Do it yourself home improvement and diy repair at doityourself.com. includes home improvement projects, home repair, kitchen remodeling, plumbing, electrical. How to install a wood burning stove, wood burning boiler, Wood burning stove. wood burning boiler. installation guide. fitting a lintel over a fireplace. enlarging fireplace. plumbing in log boiler. Survey design - how to begin your survey design project, Creative research systems offers advice on beginning your survey design project, choosing the people you will interview, writing the best questions to ask, and more.. Parties & entertaining - how to information | ehow, A party can be as simple as having a few friends over for a cookout or as complex as planning a reunion. the possibilities are limited only by your imagination.. How to properly wash and dry a car | ask a pro blog, Cookies are disabled in your web browser. to shop with detailed image, please turn cookies on and then refresh the page..
Get How to properly layout a home woodworking shop one of the best
How to properly layout a home woodworking shop ,
Monday, January 27, 2014
A Way to Take the Screw Out of Purchasing a Vintage Screwdriver Online
Collecting vintage tools has become a serious and enjoyable hobby for me. Spending time seeking out and purchasing these tools is a real blast. Paying for those purchases, not so much, but when you finally get them in your greedy little hands, the buzz returns in multiples. The two most enjoyable parts of the equation are the researching of the tool once I find one I want to purchase, and of course, the end result - owning it and being able to use it, or simply just look at it.
When I first started down this collection road, I got truly taken on the purchase of two saws. One was a Disston D-12 that turned out to be so bent, it is better suited for cutting circles than anything else. The other is an Atkins Rip that had been sharpened so many times it looks more like a keyhole saw, than a rip saw. In my defense for these two stupid moves, I will state that they were my first two purchases of vintage tools on eBay. When I made them, I had no idea what I was doing.
While it took getting taken twice, no-one had to hit me across the head with a two-by-four the third time. I swung into research mode, learned to study the images provided in these listings and worked to take the emotions out of these purchases. Since then, I have probably made thirty-odd more purchases, and I am quite satisfied with each one. Some were true deals, some were true steals and some were true must-haves at any price, which I acknowledged before I hit the submit button.
While educating myself to some extent has protected me so far from being taken again, the questionable practices of some sellers on the internet still remain; ready to take advantage of the newbies. One such listing on eBay has the following, short description; "Nice Stanley chisel, no cracked handle here, also a nice tip as well!! Check out my other listings!!!”
Have a look at the image that accompanied this description. It does show that the description is true; it does have a nice handle and the end isnt too bad. It also shows, to me at least, that everything in between is nothing but junk. Do my eyes deceive me, or is this thing seriously bent? It also might have been heated at some time, maybe to try and straighten it out, as there is something seriously wrong going on just above that "nice" tip?

I must acknowledge that this particular purchase is the first one I have made that breaks one of my own rules; “never buy a tool I wouldn’t use”, as I fully expect never to put this tool to wood. My reasoning behind this purchase is purely aesthetic; I fell in love with this tool the moment I first laid eyes on one as I believe it has exceptional proportions and is a very clever design. As a result, I just had to have one. Having watched for one at a reasonable price for quite some time now, I can tell you that discovering one for under their normal price range of $375 to $400 is next to impossible. When this one came up on eBay, the bids were far below what was expected, and to me, this is a huge warning sign. If the collectors on eBay are not willing to open their wallets for a known collectable tool, something is not right with it. The images that the seller provided were adequate, but they were your typical snapshot. They showed signs that the seller was trying to show the tool honestly as he had placed the tool against a plain background and didn’t distort the angles. Because of the exposure, however, seeing a true likeness of the tool wasn’t possible. I grabbed a capture of the image as you can no longer save images off of eBay, with the results of that capture shown below.


Now that I have it, I have to figure out what to do with it. It is not the cleanest tool I have ever purchased, nor the worst, for that matter. I do, however, want to clean it, and this is where conflict rears its ugly head. If you go online and check out the articles regarding cleaning a vintage tool, most will tell you not to touch it, other than a wipe down with mineral spirits or the like. This category of collecting is like any other category; the more it is in original condition, the more it is worth. I have this dilemma with antique furniture as well, and from my perspective, it boils down to what you are willing to live with. I own a beautiful sideboard from the Art Deco period that is made with serious quality and craftsmanship, built from solid mahogany. When I bought it years ago, for a song I might add, it had some stains and markings on its top left by some klutz who owned it before me. I do not care how magical the piece, if it looks like it shouldn’t, I’m not going to live with it, so I stripped and refinished it in a New York minute. Actually, I did this twice as I unknowingly stained it darker than I should have the first time, and realizing my mistake, did it again. Is this sideboard not worth as much now as it could be? Absolutely. Am I happier with it now than I would be if I had left it alone? Absolutely.
Unless someone can convince me otherwise, I have a feeling that the moment I receive this plane, it is going to be dunked in pot of Evapo-Rust that Lee Valley sells just for this purpose.
Peace,
Mitchell